Thousands of professionals and students connect to Cisco AnyConnect VPN every day. But sometimes the network configured by your admin may slow you down or block local network access.
A quick primer
There are two ways to configure a company VPN:
- Send all data over VPN: This may be called "Host to everywhere", "All traffic", "Full tunnel", "Global VPN"
- Only send data for the company network over VPN: This may be called "Host to network", "Split tunnel" or just "split VPN"
Many companies choose the first option to push all network traffic through the VPN by default. This is easiest to configure, but can mean that accessing regular internet sites can be slower, as the connection has to go through your VPN first.
Certain sites by also be blocked on the VPN gateway, or you may find yourself cut off from accessing devices on your local network.
Sounds familiar? There's an easy workaround...
How to adjust your company VPN to not send all traffic
Trying to connect to your office and home networks at the same time? Want to make sure not all your internet surfing is going via your company VPN?
There's an easy solution for Cisco AnyConnect VPN and you don't need to be a networking genius to set it up!
With VPN Tracker 365's Traffic Control feature, you determine which data should go via your VPN. This means all your work-related traffic will go securely through the VPN, allowing everything else to go over your regular internet connection or local network.
What you need:
- VPN Tracker 365
- VPN gateway address for your Cisco connection
- Network address for your office / university
Step One: Download the VPN Tracker 365 app
VPN Tracker 365 is the number one VPN client for macOS. With a VPN Tracker 365 Pro, VIP or Consultant license, you can configure Cisco AnyConnect SSL VPN connections on your Mac and also benefit from dozens of included productivity features:
- Support for all major VPN protocols, including IPSec, L2TP, PPTP, OpenVPN, Fortinet SSL, SonicWALL SSL, Windows SSTP, Cisco EasyVPN, and Cisco AnyConnect SSL
- Connect simultaneously to multiple VPNs
- Compatibility with the latest macOS versions, up to and including macOS Monterey
- TeamCloud centralized management features
- And much more...
Download VPN Tracker 365 here.
Step Two: Import your Cisco AnyConnect VPN connection into VPN Tracker 365
Setting up a Cisco AnyConnect SSL VPN connection in VPN Tracker 365 is easy. All you need is your VPN gateway address and your login.
To find your gateway address, just open up the Cisco AnyConnect Secure Mobility Client and copy the hostname or IP address for your connection:
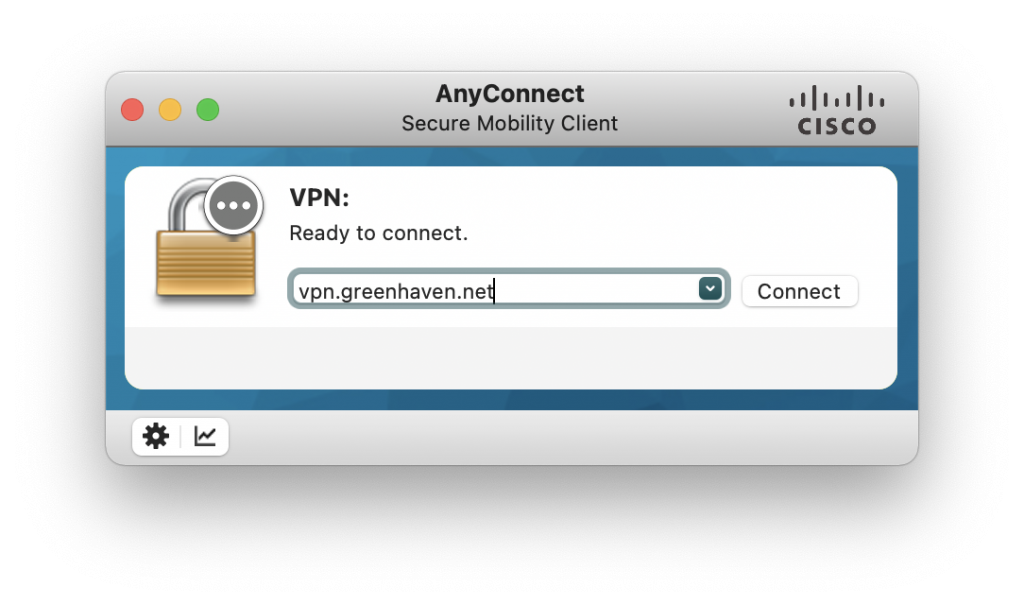 Then, go to VPN Tracker 365, create a new Cisco AnyConnect SSL connection, and paste in the address:
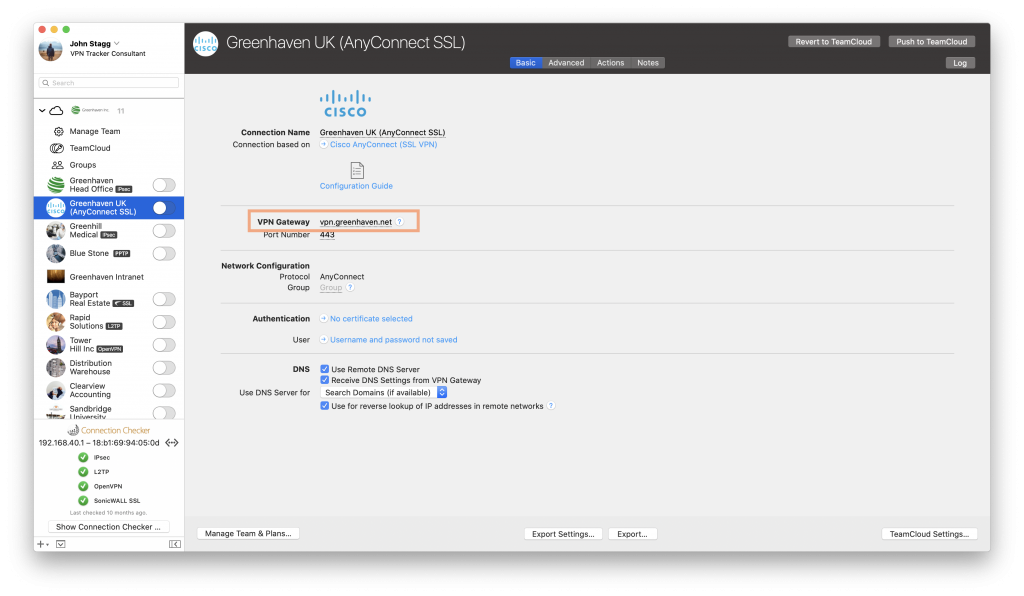
Enter your remote network address for your AnyConnect VPN connection
When you start the connection, VPN Tracker 365 will prompt you for your username and password. Now you are connected!
Step Three: Set up Traffic Control
Once you've successfully configured your connection, switch to the "Advanced" tab, where you can set up your custom VPN settings for Traffic Control.
For this step, you will need the remote network IP address.
What is the remote network IP address?
The remote network IP specifies the network you are trying to reach over the VPN (i.e. your company's internal network.)
Unsure of what to enter here? Your first port of call should be your IT admin. If you can't contact them, you can follow these steps to find out your company's internal remote network address:
- Open a page on your company's internal network, e.g. the company intranet and copy the web address
- Open VPN Tracker 365 and go to "Tools" > "Ping Host"
- Enter the address (e.g. intranet.greenhaven.net) and hit ping to reveal the IP address (e.g. 192.168.10.12)

Use the ping tool in VPN Tracker 365 to identify your remote network address
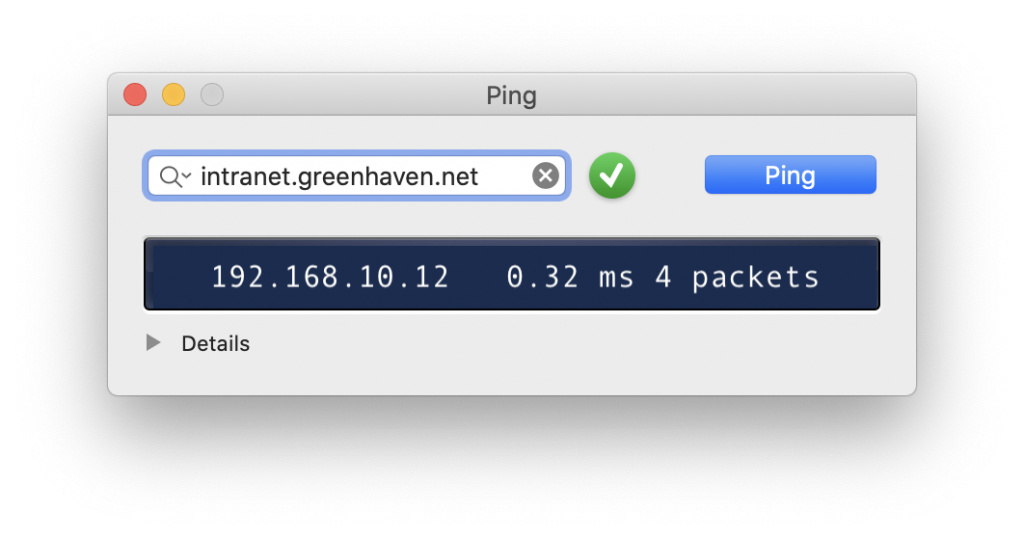 Then, simply replace the last digits with a "0" to get the remote network address > 192.168.10.0. (Note: this is a bit simplified, but will work for most common network setups out there).
In the Traffic Control dropdown menu, choose "Only send traffic for the following addresses over VPN" and enter the remote network address from the previous step:
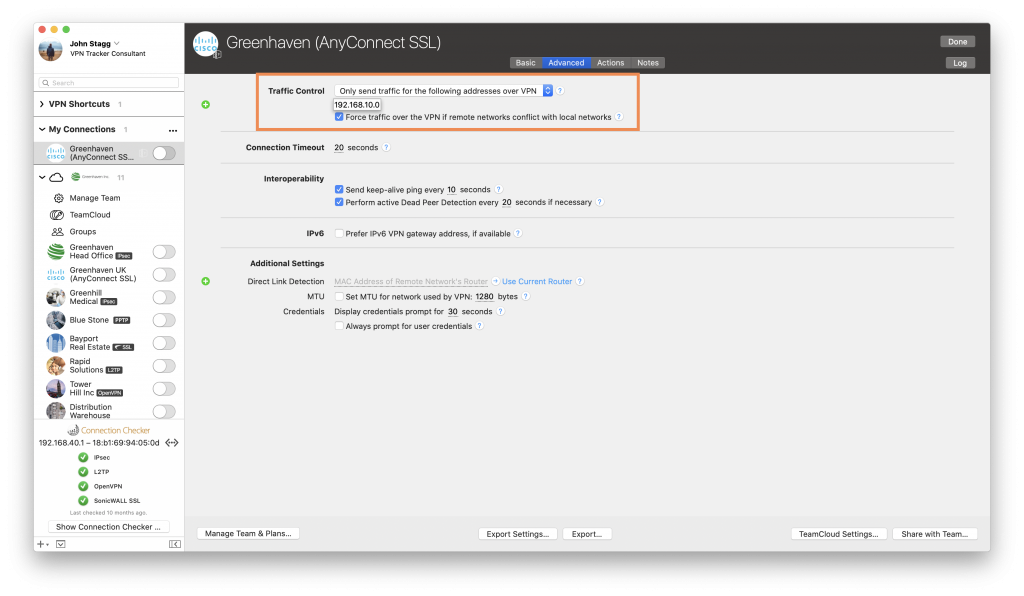
Your Cisco AnyConnect VPN connection will now only be used when accessing addresses which are part of the network you specified. This means all other traffic (i.e. your normal internet traffic) will go through your internet connection as it does normally, bypassing your VPN.
![]()
Trust the #1 VPN client for macOS:
VPN Tracker securely connects thousands of Macs worldwide with VPNs every day. VPN Tracker was developed from the ground up in our head office in Munich. You can trust in our long experience working with advanced VPN technology.


